Tag Archive for: Indiana

Kitchen Lighting 101: 4 Essentials to Consider in Your Next Kitchen Remodel

Homeowners choose, as priority number one, to remodel their kitchens every year, and it’s no surprise why. Every member of the family spends significant time in this room. It’s where we prepare meals, gather for games, congregate for chats, get work done, discuss family plans, snack, laugh, talk and make all kinds of daily decisions. And yet, as popular and as often-used as this room is, it’s surprising that lighting becomes an afterthought in the remodeling process. Instead, kitchen lighting should be an integral part of the entire design process, right from the start. It needs to be layered and carefully planned to effectively illuminate all the various activities your family enjoys in this space. As you plan your next kitchen remodeling project, keep these four lighting design essentials in mind:

1. Know Your Lighting Types

There are four basic types of lighting that can be used in any room. The utility and high-traffic areas of the kitchen demand using all four of them in various ways. These lighting layers include:

Ambient Lighting—This is broad, general lighting that should illuminate most of your living space. It’s not too bright, but it provides enough light to enable you to perform tasks and move safely about the room—a necessity for any space, and especially the kitchen. You can choose from a host of different light fixtures to include recessed lighting, track lighting, chandeliers or other ceiling-mounted fixtures.

Task Lighting—While ambient lighting provides general illumination of a large space, task lighting highlights specific areas where work needs to be performed. It illuminates focused beams on specific areas, removing unwanted shadows, making slicing, mixing, kneading and reading ingredients on food packages or a recipe a breeze. For example, puck or strip lighting placed under cabinets are used to illuminate countertops for food preparation. You can also consider adding task lighting inside of cabinets to make it easier to locate rare spices (or essentials) hiding in the back.

Accent Lighting—These bright beams are used to throw flattering light on a specific design element in a room. While they are par for the course in living rooms and dining rooms, they can also be used to highlight some lovely aspect of your kitchen design. For example, a shelf in a cabinet or island can be highlighted by accent lighting to spotlight a unique heirloom or art piece. Highlighting an accent fixture that is 4 to 5 times brighter than ambient lighting can really set off the space.

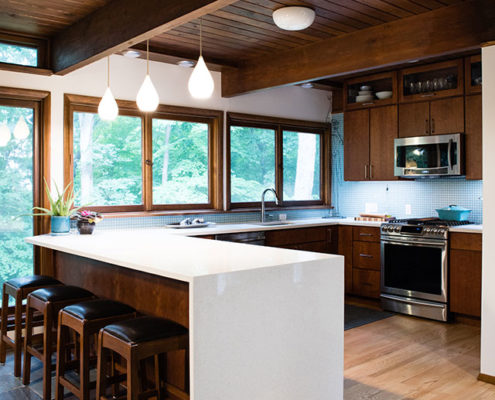
Decorative Lighting—While accent lighting focuses your eyes on a particular design element or piece of art in your kitchen, decorative lighting is the design element itself. A dramatic pendant or chandelier can really complete the look of your kitchen and make visitors take notice.

As you work with your design/build team on a kitchen remodel, make sure to discuss these kitchen lighting essentials from the outset and not as a last-minute decision.

2. Understand the Sources of Illumination: Think LEDs

In addition to the four different lighting types above, you’ll want to consider the ways in which lighting works and how much it might cost you. In the past, homeowners had to choose between fluorescent, incandescent and halogen options. Recently, however, LED lighting has taken kitchen lighting by storm with its bright adaptability and its very low electricity draw. LED lights last longer and they don’t heat up like other light sources. This makes them a safe, stable source of illumination that comes in almost any form.

Important Note: Don’t count out natural light in your kitchen design. Explore ways that you can increase it and add to the ambient lighting in your living space.

3. Design with Light: Think Spacing and Proportion

It’s easy to get all excited about light fixtures, even adding more than your kitchen really needs. But going overboard on lighting is just as bad as leaving it to the last minute. Think balance and proportion to get the right look, along with the proper illumination. For instance, island task lighting has very specific space and proportion guidelines you should follow:

Above island pendants should have between 30 to 32 inches between them and hang approximately 30 to 36 inches over the island, with a 6-inch clearance from the edges. Depending on how long your island is, you may have room for 2 or 3 pendants.

If you have a higher kitchen ceiling, consider a linear suspension light fixture over the island. This should hang about 40 inches above the workspace.

Recessed lighting, puck lights, track lights, and chandeliers also have similar spacing and proportion rules, something you’ll want to consider as you plan your kitchen remodel.

4. Ask a Kitchen Design Expert about Your Kitchen Lighting

Lastly, don’t let decisions about kitchen lighting overwhelm you. If you’re struggling to choose between pendants and chandeliers, track lights or recessed lighting, or any other aspect of the lighting in your kitchen, take a look at our kitchen remodeling portfolio for some ideas. You can also sign up for one of our free kitchen design seminars where you can discuss your ideas and questions with other homeowners and our design experts. If you’re ready to dive in and get started now, schedule a personal consultation and begin the process of upgrading your kitchen with light: (765) 838-1644.

2018 Stylish Design Trends for the Bathroom

The best new looks coming to Lafayette, Indiana

If you’re like most people, your bathroom has become a personal sanctuary—a place to cleanse and rest from a hard days work. So, when you remodel your bathroom, you’re not just creating a functional bathing space, you’re creating a type of oasis—a place to relax, rejuvenate, and find yourself.  When it comes to designing a plan for your bathroom, everything matters – from the materials to the fixtures, the floor plan, and lighting.

If you’re looking to remodel your bathroom or starting a remodel and making selections, this year is bringing in some stylish design trends to consider.

As a full-service design build firm servicing Tippecanoe County, Riverside Construction is staying up with these current bathroom design trends, helping homeowners choose the latest and greatest in bathroom products and features.  Here is what is trending in bathroom designs for 2018:

Fabulous Furniture-Style Vanities

Who says you can’t have furniture in the bathroom?  Today’s market offers a wide assortment of beautiful sideboards, desks and cabinets (manufactured or repurposed) that can be used as a bathroom vanity—providing beauty and function to any bathroom.  No matter if your design style is farmhouse or ultra contemporary there is a furniture-style vanity that can fit your every need.

Stand Alone Tubs

While there has been a shift away from tubs to showers, homeowners who elect to keep their tubs are doing so in style. Large freestanding single-person tubs can function as a stunning focal point in the bathroom, offering everything from soothing jets to a deep basin for fully covered soaking. Another benefit?  Hydrotherapy!  A warm water soak can help with everything from pain relief and increased circulation to improved joint motion. Moreover, tubs are standing on their own when it comes to pure rest and relaxation. Now, who wouldn’t want that?

Trending Tile

Bathroom tile never gets old. In fact, it’s exploding with new colors and creative designs. On top of the list of hot bathroom trends is tile that mimics the look of other materials, such as wood, stone, or concrete.  Hardwood floors are never a good choice in bathrooms due to the risk of water damage. But, now with the new wood-look tile, you can create the warm natural look of wood without worrying about water damaging the floor.  3D tile is also being used to add interesting texture and dimension to a bathroom.  Geometric tile in various shapes and sizes offers endless design possibilities that include wave patterns, hexagons, diamonds, chevron patterns and even stars. These eye-catching shapes are used on the floor and are also being used as bathroom backsplashes, on shower walls, and even as ceiling accents.

Quartz and Its Quartz Cousin

Quartz Look Alike Solid Surface Product

Quartz countertops have become homeowners’ first choice, over granite, for its durability, easy maintenance and variety of color and design options. However, solid surface manufacturers have also been busy creating a wide range of Quartz-like countertops that mimic the look and durability of Quartz but at a fraction of the cost. These two products are popular considerations for your next bathroom remodel.

Sensational Sinks

There are several remarkable sinks and vanities on the market today. Many of the current models have beautiful decorative patterns. Others are colorful or made of natural stone, wood, glass and even metal. Below is a list of some of our favorites gaining in popularity.

Trough and bucket sinks are wide and deep providing lots of functionality with plenty of fresh design options for both the master and kid bathrooms alike.

Integrated sinks provide a sleek silhouette that works well with a contemporary style bathroom. We also love glass vessel sinks that act as a beautiful piece of artwork right on your bathroom countertop.

Luxury Showers

Homeowners love their showers. They are not only getting grander they are getting larger. These oversized showers offer ample space for features like built-in bench seating, custom shelving, rain showerheads, or even multiple showerheads. Many bathrooms are also being upgraded to luxurious, spa-like showers that offer a number of indulgent features such as pebble tile shower floors, a steam function, built-in sound system, to name a few.

Curbless showers are also at the top of Lafayette homeowners’ wish lists. These popular walk-in showers offer the convenience of easy access and cleaning, while also providing a spacious, clean, sleek look that will stand the test of time. It’s also a smart choice for aging-in-place homeowners looking to stay in their homes for long periods of time.

If you’re ready to break the mold and incorporate your unique design style into your bathroom, call Riverside Construction today or request a complimentary design consultation here. We’d be happy to guide you through the process.

For further design inspiration visit our Bathroom Portfolio.

Sign up for a free educational seminar on kitchen and bathroom remodels. Learn how to design value into your home, how to budget for your remodel, how long your project should take, current design trends, new products to consider, and how to choose a contractor wisely. Space is limited, so RSVP early.

If you found this bathroom design article helpful and would like to receive future articles as they are published, we invite you to subscribe to our popular monthly e-Newsletter.

10 Ways to Winterize your Midwest Home

Winters here in Indiana—just like anywhere in the Midwest—can be severe. Your home is your most significant
financial investment, so it’s extremely important to prepare it well for winter. The inevitable freeze-thaw cycle, high
winds, freak snowstorms and pounding rain can wreak havoc, but there’s a lot you can do to prevent or minimize
winter damage to your home, particularly if you follow these 10 home winterization steps:

1. Inspect, Clean and Repair Your Roof and Gutters

This time of year, be sure to inspect all of your gutters and your roof. Repair any damage if necessary, and be
absolutely sure to clean out the gutters and downspouts. Fall leaves, animal nests and anything else should be
removed so that water can efficiently flow off of the roof and away from your home and its foundation.
Clogged gutters that fester over the winter can cause water leaks in your home and damage to the foundation. Not
only that, but during particularly harsh winters with a lot of snow, ice dams can form, causing more leaks and roof
damage. Ice dams often form due to insufficient insulation in the attic (see point 9). This one home winterization tip
alone can save you and your family thousands of dollars in water damage and a whole lot of hassle!

2. Seal Asphalt Driveways

The wild variations in temperature we experience here in Indiana over the winter can cause significant damage to
asphalt driveways. Water can infiltrate small cracks in your driveway during warm wet weather. When the
temperatures dip below freezing, that water freezes and becomes ice that expands, making the cracks bigger and
more expensive to fix—sometimes entire chunks of asphalt come loose, causing potholes. Regularly inspect your
driveway for cracks and remove debris. Have your driveway sealed on a regular basis (usually every 2-3 years). A
warm summer day is actually the perfect time to have this done (put on your calendar next year). Seal-coating fills
and repairs small cracks from water infiltration so they don’t get big and expensive.

3. Search for Leaks around Windows and Doors

Inspect both water and air leaks around every window and door to your home. The source of any water leaks
should be found and repaired immediately. Drafty air leaks should also be repaired with the appropriate weather
stripping or insulation to cut down on heat loss and winter energy bills. If you have screen doors, have your
contractor swap them out for new storm doors that can help prevent energy and heat loss. Also, consider updating
any older windows to more energy-efficient storm windows.

4. Protect Your Pipes

We cannot stress this one enough—burst pipes can cause all kinds of water damage and misery in the winter, but
you can take many steps to prevent this from happening:

  • Disconnect all hoses and store them over the winter
  • Drain all of the outside pipes so no water is left to freeze, thaw and burst the pipes
    Winterize your sprinkler systems
  • Make sure pipes are insulated to protect them from excessively cold temperatures
  • If you go away for the winter, make sure your thermostat keeps the heat in your home to at least 55-60
    degrees to keep pipes from freezing
  • Just to make sure, have your contractor check the pipes and water main to ensure it’s all ready for
    whatever winter brings

5. Give Your Furnace a Checkup

Have your furnace checked to make sure it is in top condition before cold weather hits. Make sure the filter has
been changed and that all of the ducts are clean, in good repair, and that there are no leaks in the system. Also,
double check that the furnace and other exhaust vents are clear of snow accumulation on a regular basis. It’s very
important to have a professional help you with the furnace, ventilation, and pipes so you don’t have any nasty
surprises during a cold snap.

6. Fireplace Maintenance

If you have a fireplace, your home and family’s safety depends on having the chimney’s swept and maintained.
Check that the damper opens and closes. Double check the condition of the bricks and mortar and, if necessary,
have a screen installed at the top of the chimney to prevent small animals from coming inside.

7. Check and Service Your Snow Blower

Before the first snow hits, you want to make sure your snow blower is ready for action. Fill it with gas and oil,
double check the spark plugs and make sure it’s otherwise in full working order. Also, make sure you have easy
access to snow shovels and that you have a good supply of de-icing salt to prevent trips, falls and accidents on your
property.

Conversely, put your lawnmower and other warm weather yard equipment to bed properly for the winter by
draining the oil and gas and draining all of the hoses before you store them.

8. Prepare Your Yard: Trim Trees and Vegetation

Have any trees and bushes near your home inspected and trimmed—particularly any with limbs overhanging the
roof or close to windows. Wild wind and ice storms can snap these trees and cause them to crash into your home.
Even if they’re healthy, limbs too close to the house can brush against the siding and roof, causing damage.

9. Insulate Your Whole House

Check all of the areas of your home where insulation might be insufficient. Improper attic insulation can cause ice
jams, for example. The walls, doors, windows, ducts, and areas where pipes or wires enter the house also need to
be checked. Improve insulation wherever it’s currently insufficient.

10. Prepare for Winter Weather and Power Outages

Blizzards, ice storms, and other mishaps can cause widespread power outages, so be prepared. Consider talking to
your contractor about installing an emergency generator. Make sure to have an easily-accessible emergency kit
with flashlights, extra batteries, an emergency radio (with a hand-crank option to help charge your cell phone),
blankets, cold weather gear (gloves, scarves, hats, boots), non-perishable (easy-to- prepare-without- electricity)
foods and extra water. If you have a fireplace, make sure you’ve got plenty of firewood stocked up.

Contact your Riverside Construction team to help you accomplish any of the items on this home winterization
checklist, even if it’s just a recommendation for a potential service provider. We want to make sure you are
prepared for winter’s worst! By following these helpful winterizing tips, you’ll have peace of mind, improve your
safety and save you money all season long!